In part 8 of this production basics series, we’ve introduced some synthesis techniques. Before we dive into advanced synthesis techniques we will start with the basics. Subtractive synthesis is used in 90% of the synth’s you’re likely going to use and isn’t that difficult to understand. We will look at all the parts that go into a subtractive synth spread out over a couple of articles. In this article, we will start with the source of a subtractive synth, the oscillator.
Oscillators
It all begins with a single oscillator or tone generator. An oscillator will create a steady pitch which can be played musically by a keyboard. Oscillators can generate various waveforms, each with its own specific frequency characteristics.
Waveform Types
Sine Wave
A waveform is a periodic signal which repeats indefinitely. The most basic waveform that exists is the sine wave. It has one fundamental frequency with zero harmonics.
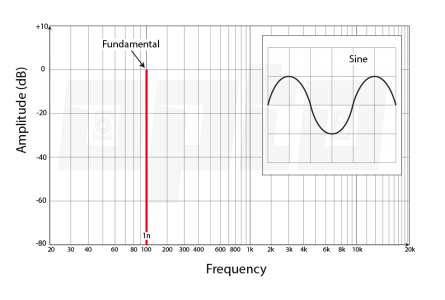
Harmonics are multiples of the root note. A root note of 100Hz will have harmonics of 200Hz, 300Hz, 400Hz, and so on. Every sound we hear can eventually be reduced into a combination of sine waves mixed together to form a complex wave.
Triangle Wave
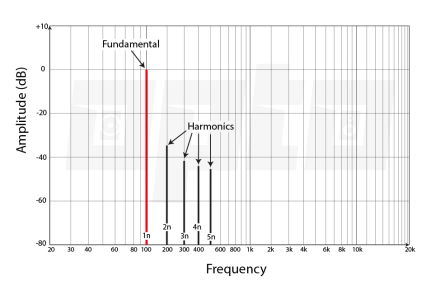
The triangle wave is similar to the sinewave but features a number of odd harmonics. So if the root note frequency is 100Hz the odd harmonics will be 300Hz, 500Hz, 700Hz, and so on, with higher harmonics decreasing in amplitude pretty quickly.

Note: only the first few harmonics are illustrated.
Square Wave
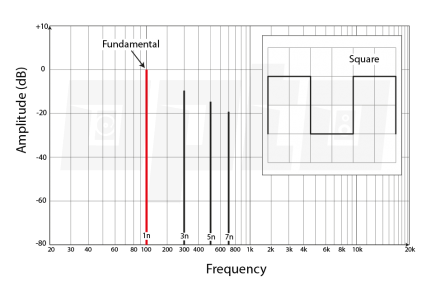
Just like the triangle wave the square wave also exists of odd harmonics only louder. A square wave has a duty cycle of 50% which means it’s on for half a periodic cycle and off for the other half. Increasing the duty cycle will widen the on-state and decreasing the duty cycle will narrow the on-state. This results in a pulse wave.
Saw Wave
Another basic waveform used in a lot of synthesizers is the saw wave also known as the ramp waveform. The saw wave contains both odd and even harmonics and sounds less harsh than a square wave. It is often used as a starting point for string and pad patches.

Noise Generator
The last waveform that is actually not periodic is the noise generator. Noise basically consists of all frequencies quickly succeeding each other in a random fashion. Noise types are indicated by colors with white noise being the most common one. White noise frequencies all have the same average loudness.
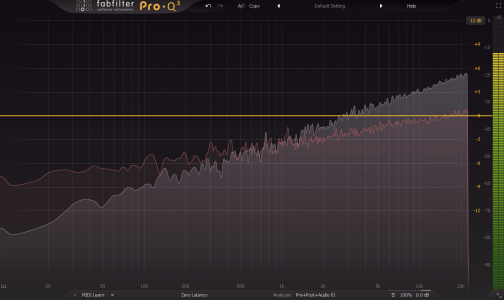
Another noise color is Pink Noise in which the amplitude is the same for each octave band. This means that pink noise in the 100Hz-200Hz band is as loud as the 10kHz-20kHz band. This is the same as applying a lowpass filter with a slope of 3db/octave to a white noise signal, slowly attenuating high frequencies. Brown Noise is a bit darker and features a slope of 6db/octave.
Parameters of oscillators

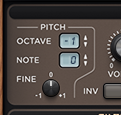
In addition to selecting the waveform, an oscillator has other parameters found in most synthesizers. This includes a way of changing the pitch. Most synthesizers have a course pitch knob that works in semitones (another name for a half step) and a fine pitch knob that works in cents, one cent being 1/100th of a semitone. Some synthesizers also include an octave knob to quickly change the octave.
Voices
We’ve talked about melodies and basslines being monophonic before, and chords being polyphonic. Synthesizers also use these terms to indicate the number of voices they have. A monophonic synth usually only has 1 voice. Imagine a voice being like one singer in a choir. A singer can only sing one note at a time. The same is true for a monophonic synth that can only play one note at a time. If you play a new note the previous note is released (turned off).

A polyphonic synth can have multiple voices. So if you have a polyphonic synth that has 4 voices, you can play 4 notes at a time. Most polyphonic synths have a switch to change synth’s behavior to monophonic but at the same time still featuring 4 voices. This is equal to a choir were all singers sing the same notes at the same time. This brings us to a new parameter.

Unison

Unison, sometimes called Detune, spreads the pitch of all voices around by a variable amount. So some notes play a bit flat while others are slightly sharp. This emulates a real choir with real singers who never sing 100% in tune with each other. This parameter is often used to thicken a sound a little.
Panning

Most software synthesizers like Sylenth1 and Serum allow you to pan each oscillator from left to right in the stereo field. Sylenth1 also has a separate stereo knob which spreads each voice to a different place in the stereo field.
Phase
The phase parameter allows you to delay one oscillator in time with an offset between 0° and 360°. If you have 2 square wave oscillators for example with the phase of both at 0° they sum together to be twice as loud.
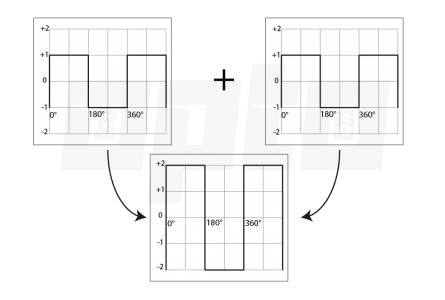
If you invert the phase of one oscillator or offset one oscillator by 180° you get no sound at all. Why is that? Because one sine wave moves up while the other is mirrored and thus moves down at the same time. So when one sine wave has an amplitude of 1 and the other has an amplitude of -1 at the same time they cancel out because 1 – 1 = 0.
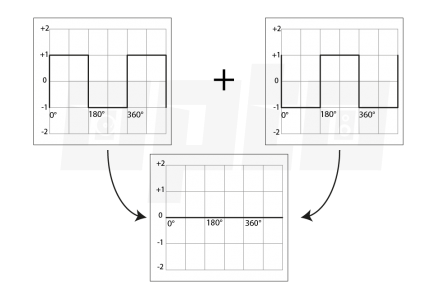
The more a sound is out of phase the more low end you lose so this parameter can be changed to alter the sound drastically.
Retrigger
Retriggering means that each time you press a key on your keyboard the oscillator resets to the beginning of the waveform. If retrigger is off the oscillator keeps on running whether your press a key or not. This means that the phase is different each time you press a key resulting in a slightly different sound with every keypress.
Oscilllator sync
The last parameter I want to explain in this article is oscillator sync. Oscillator sync is used with 2 oscillators where one oscillator follows the other oscillator. This feature is found in the classic Minimoog and it’s software emulations. Every time oscillator 1 completes its cycle, oscillator 2 is reset, which forces oscillator 2 to follow the pitch of oscillator 1. By tuning oscillator 2 you can create harmonically rich sounds.
With just a couple of basic waveforms, you can already create thousands of sounds. In the next part, we’ll continue down the signal path of a subtractive synth and take a look at the filter section.
